How to read waves and how to interpret them can be considered an art. As you progress from a beginner to an intermediate surfer and eventually become an expert, your experience in reading the waves and predicting where they will break will grow. Yes, reading waves is not a skill that can be mastered overnight. To better understand the ocean’s patterns and improve your ability to read waves requires spending a lot of time in the water. This is why, after years of surfing, you may still notice that local surfers or those with extensive experience start paddling in preparation before a wave even begins to break—while you’re still standing there, cluelessly watching.
This article introduces how to read waves. Laying a solid foundation with these theoretical insights, combined with years of practice, is the key to becoming a master at reading waves. If you are interested in OEM surfing products, welcome to contact us.
How to Read Wave?
When you see a wave rising from the horizon, you predict that this wave will reach its breaking point because it’s gradually moving toward the shore. At this moment, the wave will take on different shapes, but in most cases, it will form as a right-hand wave (right), a left-hand wave (left), an A-frame, or a closeout.” Here is the information to tell you how to read waves for your reference.
Read Waves: Know the Left Wave
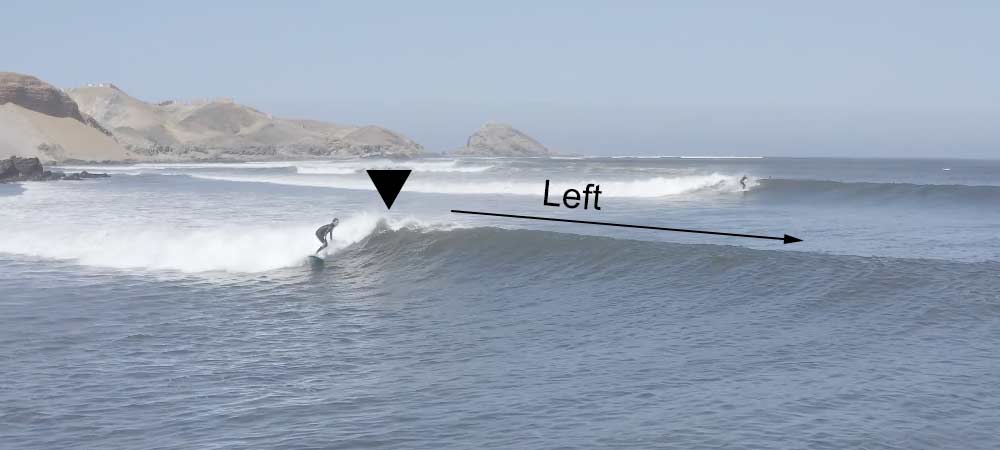
A left wave is a type of ocean swell that breaks in a specific direction relative to the surfer’s position. For the surfer riding the wave, this means turning and moving to the left as the wave progresses toward the shore. While it may appear different to onlookers from the beach, surf terminology always prioritizes the perspective of the surfer, making the left-breaking wave distinct in its directionality.
The characteristics of a left wave vary depending on factors such as swell angle, wind conditions, and the shape of the ocean floor. In ideal conditions, these waves offer a smooth face for the surfer to carve through, providing ample opportunity for maneuvers like bottom turns, cutbacks, and snaps. Unlike a right wave, where the surfer moves to their right, a left requires adaptability and control, particularly for those who favor regular stance.
In certain regions, left waves are highly sought after due to their unique formations and rideability. They present a thrilling challenge, especially in reef breaks, where the wave barrels and allows for deeper positioning in the pocket. Understanding the nuances of how to read wave breaks is crucial for mastering surf strategy and technique.
Right-hand wave
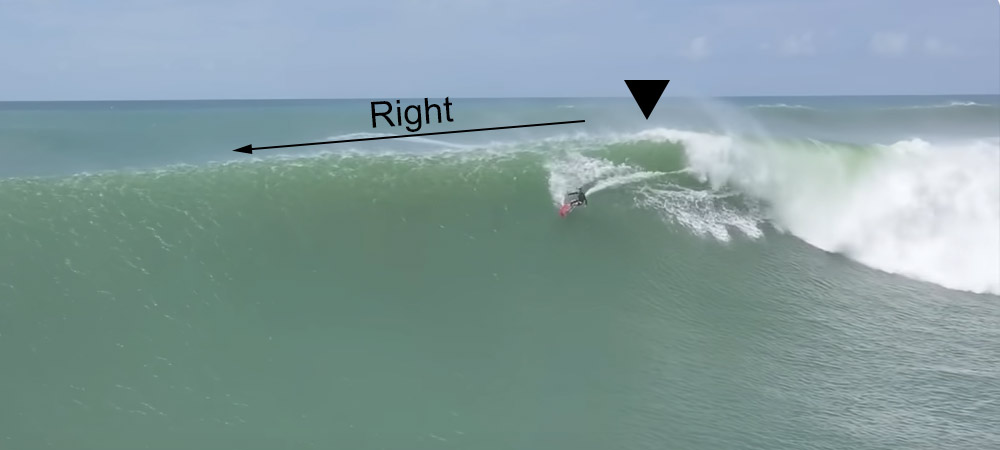
To read wave for the right side, you need to know what a right-hand wave, or right wave is. It is a type of wave that breaks to the surfer’s right side as they ride it. From the surfer’s perspective, facing the shore, they will turn and ride the wave in a rightward direction. This terminology remains consistent regardless of how the wave appears to observers on the beach, as the surfer’s viewpoint defines whether it’s a right or left wave.
When you read waves, right-hand waves provide surfers with a smooth, often elongated face to perform maneuvers such as cutbacks, top turns, and floaters. The characteristics of a right wave can vary based on factors like the swell direction, wind, and ocean floor topography, but in many cases, they offer clean and rideable walls.
In certain breaks, especially point breaks, right-hand waves can peel for long distances, allowing surfers to execute multiple maneuvers in one ride. These waves are especially favorable for goofy-footed surfers, who surf with their right foot forward, as it allows them to ride in their natural stance. Right-hand waves are popular in many surfing destinations worldwide, and mastering the art of reading the waves and riding them is key to advancing surfing skills.
A-frame wave
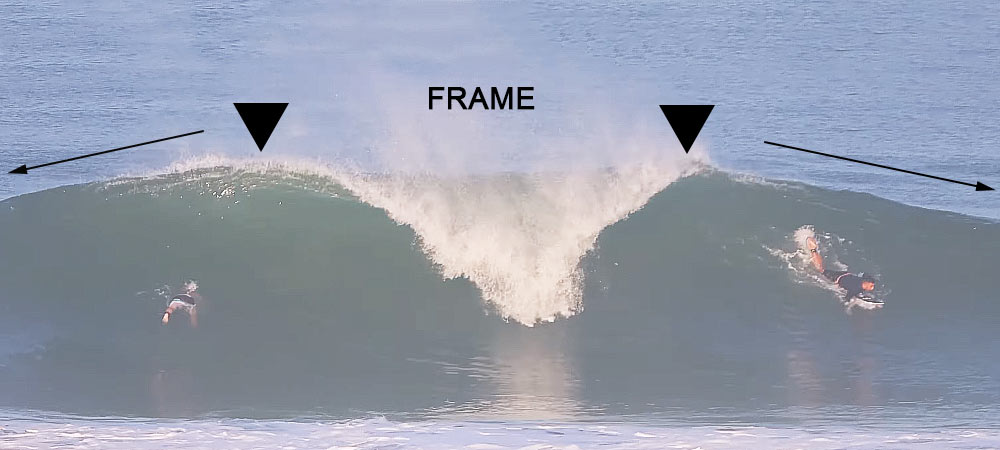
An A-frame wave is a type of wave in surfing that breaks in a symmetrical manner, creating two distinct shoulders that peel off in opposite directions. This means the wave breaks from a peak in the center, allowing surfers to choose either a left or right direction to ride. The term “A-frame” comes from the shape of the wave, resembling the letter “A” as it rises and begins to break. To read waves effectively, surfers must recognize this formation to anticipate which direction to ride.
A-frame waves are highly sought after by surfers because they offer multiple options for riding, making them ideal for both regular and goofy-footed surfers. These waves tend to be more predictable and allow for longer rides due to their evenly distributed energy. They can be found in various surf spots, often at beach breaks where the sandbanks are well-formed, or at reef breaks with consistent underwater topography.
Closeout Wave
A closeout wave is like an unexpected trap for surfers, breaking all at once along its entire length, leaving no clear direction to ride. Instead of peeling gracefully to the left or right, the wave crashes simultaneously, making it nearly impossible for anyone watch waves to perform smooth maneuvers or enjoy a prolonged ride.
Closeout waves often appear when the ocean floor is flat or when the swell loses its form due to shifting conditions. As surfers read waves closely, they may notice that, unlike the clean break of an A-frame or a peeling wave, the closeout offers no open face, leaving them caught in a chaotic collapse. These frustrating waves frequently occur at beach breaks, especially when the sandbanks aren’t well-formed or the swell is too powerful for the break’s structure.
Advanced surfers, however, sometimes still take on the challenge of closeouts, seeking quick barrels or short bursts of adrenaline before the wave fully collapses. But for most, these waves are best avoided, especially when looking for that perfect, smooth ride across the open face of the ocean. So, as we said a surfer to read waves before surfing is very important especially for the beginners.
Read Waves: Analyzing the Different Parts of a Wave
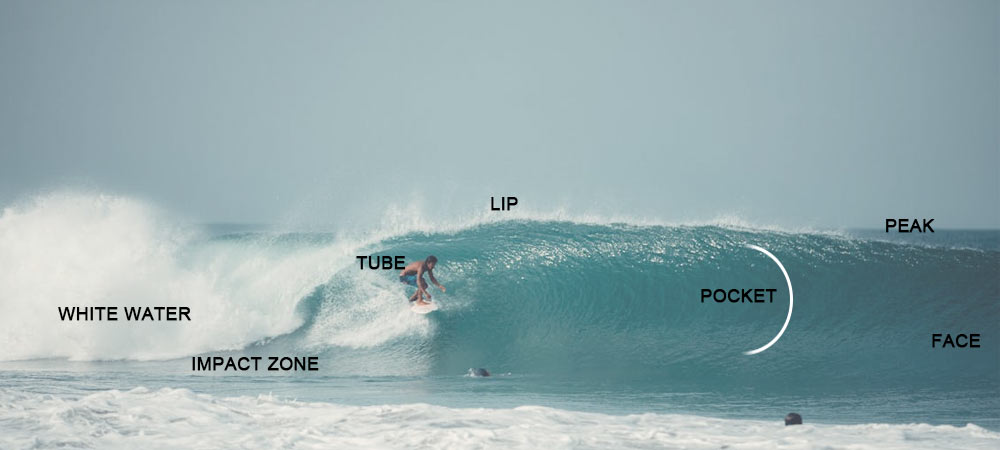
To read waves and understand them, the fundamental skill is correctly identifying the various parts of a wave and understanding their names. This is crucial for effective communication with instructors during surfing lessons.
Lip: The lip is the top part of the wave that tilts downward as the wave prepares to break. It is the most powerful section of the wave, and its energy can be quite intense as the wave crashes.
Shoulder/Face: The shoulder or face is the part of the wave before it breaks. Surfers often ride from the breaking point towards the shoulder, where the wave is more rideable and less chaotic.
Curl/Pocket: The curl or pocket is the steep, “concave” part of the wave at the shoulder. This area is where advanced surfers perform tricks like airs or snaps. Surfing in this section can feel akin to executing tricks on the walls of a skate park.
White Water/Foam: White water or foam is the frothy, broken wave that forms after the wave has crashed. It’s typically where beginners practice, and while it may seem less challenging, it can still be quite powerful and enjoyable, especially in places like Bali, where even foam can provide exciting rides and turning opportunities.
Impact Zone: The impact zone is where the lip falls and is the most turbulent part of the wave. Surfers should avoid this area while waiting for waves or paddling to the lineup, as it is where the wave’s force is most intense and can be overwhelming.
Tube/Barrel: The tube or barrel is the coveted, hollow part of the wave. Surfing through a barrel is considered the pinnacle of surfing experience, offering a thrilling and beautiful ride. If a surfer can make it through a barrel, it’s often a highlight of their session. If not, they may end up wiped out or caught in the “washing machine.”
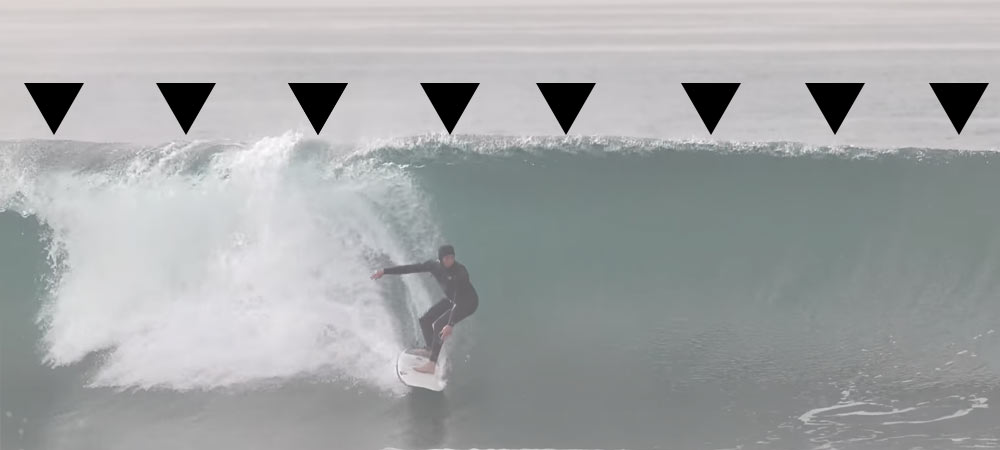
Peak: The peak is the highest point of the wave after it forms. Identifying the peak is essential for wave reading, as it marks the beginning of the wave’s break. Incorrectly identifying the peak can lead to poor judgment of the wave’s break point and potential danger. The peak is where the wave starts to break and is the key reference point for surfers.
Adjusting Your Position in the Water
To read waves and adjust the position is also the key to surfing, here is some information about it.
Identify the Peak
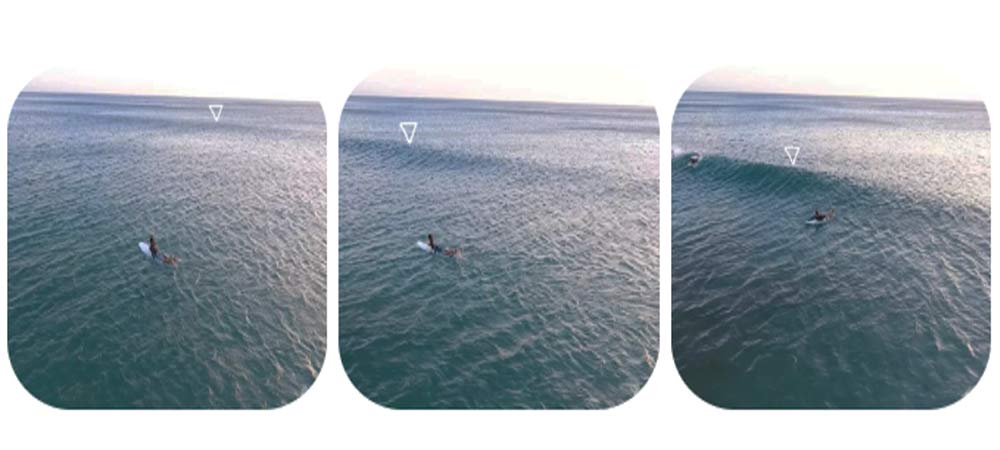
When you’re sitting on your surfboard waiting for a wave, observe the rising swell and locate the peak of the wave. This is where the wave will break. Spotting the peak is crucial as it helps you position yourself effectively for the upcoming ride.
Paddle to the Peak
The sooner you identify the peak, the better. Ideally, you want to reach the peak before the wave breaks, giving you time to rest and prepare. If you don’t make it to the peak before the wave breaks, it’s advisable to paddle towards the shoulder of the wave to catch it before it breaks completely.
Turn and Paddle
Once you reach the peak at the right time, immediately adjust the direction of your surfboard and get ready to catch the wave. This positioning will set you up for a successful ride, making the most of the wave’s energy.
Making Decisions
Your ability to read waves will help you to make the right decision. When two surfers are catching a wave from the same A-frame, the ideal situation is to have the wave to yourself, allowing you to choose either the left or right based on your preference. However, if both surfers are paddling for the same wave, it’s important to coordinate—one should go left, and the other should go right to avoid collisions and ensure a smooth ride for both.
When paddling from the shoulder of the wave, the steeper the shoulder, the slower the speed. A longer shoulder extending from the peak may indicate that part of the wave could close out. For beginners, this means a higher chance of getting caught in the white water, so it’s advisable to choose a steeper shoulder to ride. This often results in a more manageable and enjoyable experience.
Sometimes, beginners might perceive a wave as a closeout, while experienced surfers might see it as a good opportunity. A wave that seems like a closeout at first glance might actually have a well-defined peak and a long shoulder upon closer inspection. If you adjust your position to catch the best part of the wave, you can still make impressive maneuvers even if some parts of the wave are prone to closing out.
Conclusion
Reading waves for surfing is a journey that evolves with experience. As you progress from a beginner to an advanced surfer, your ability to read waves and predict wave behavior will significantly improve. Understanding the nuances of different watch wave types—whether it’s a left, right, A-frame, or closeout—and the various parts of a wave, from the lip to the peak, is crucial for honing your surfing skills.
Recognizing the peak and adjusting your position accordingly allows for a more successful ride, whether you’re riding alone or navigating crowded surf spots. The key is to continuously practice and apply theoretical knowledge in real-world conditions, as surfing is as much about adaptability and experience as it is about technique.
Ultimately, the ability to read waves and adjust your strategy based on wave predictions will elevate your surfing to new heights, transforming your approach to every session in the water. Keep refining these skills, stay observant, and embrace the challenge, and you’ll find yourself mastering the waves in no time.
